What the Action can do: This Action lets you do the following:
- The Site Map Action automatically generates a Navigation Map of pages and folders that reflects the structure of your web site.
The key thing about the Site Map Action is that it generates this map automatically by populating a standalone Acton item on your page with a list of pages and page folders. This means that when the structure of your site changes (i.e. you add pages or folders, or change the names or existing pages and folders) the Site Map will update automatically.
The Site Map Action generates its content from your site’s structure so you will need to build the structure of pages and page folders within your site before you see it working correctly. However, because it updates as you build the structure of your site, you can apply it at any time during the construction of your site. To use the Action.
- Click on the Action tool in the Freeway tool bar and choose Site Map.
- Draw an item on your page then make it the size you want and position it in the place you want it to appear.
To understand what the options do, see the screenshot below which shows a Freeway site which has multiple pages stored inside page folders.
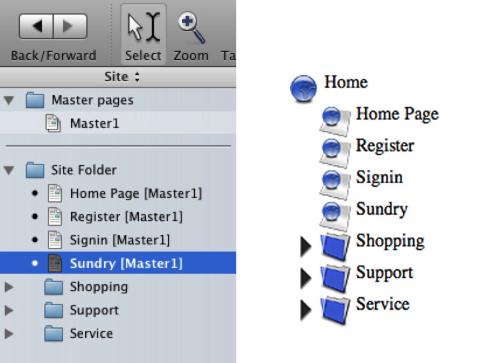
In the screenshot you can see how the pages of the site are structured. The Home page is at the root level of the site, along with three page folders ("plants", "gardeningequipment" and "sheds"). Inside the three page folders are other pages and page folders - for example, in the "plants" folder are four sub-folders ("annuals", "perennials", "shrubs" and "herbs"). In the "herbs" page folder are five pages "herbs" (a generic page to act as an introduction page) along with "parsley", "sage", "rosemary" and "thyme". In the browser view (which shows how it displays when previewed in a browser), you can see this same site structure.
The text which appears in the site map list when viewed in a browser consists of a list of hyperlinked text which lets the visitor click on any page or page folder to link to that location of the website.
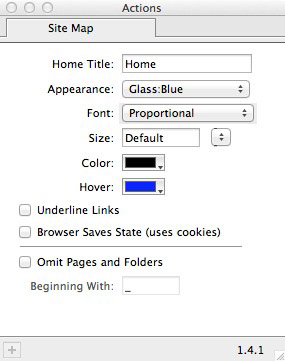
The options in the Actions palette when the Site Map item is selected on the page are as follows:
- Home title: This is name which will be displayed at the top level of the site map
- Appearance: This popup displays a list of preset "themes" for you to select from. At the bottom of the Appearance popup is an option for "Select Folder…" which lets you choose a folder of custom images to use for the graphic icons used in the site panel list (see below).
- Font: Choose the font you wish to use for the text/links in the site panel list.
- Size: Choose the size of the text for the text/links in the site panel list.
- Color: Choose the color used for the text/links in their "Normal" state.
- Hover: Choose the color used for the text/links in their "MouseOver" (or "Hover") state.
- Underline links: Lets you choose the underline behavior of the text/links.
- Browser Saves State: Lets you choose to allow the browser to remember which page folders are opened or closed when the page was last visited. Note that this requires a cookie to be set.
- Omit Pages and Folders: Enter a character (or set of characters) in the "Beginning with" field so that pages or page folders beginning with that specified character/set of characters will be ignored and left out of the site map list.
Using Custom Images with the Site Map Action
The Action lets you choose a custom graphic for each the graphics used in the site map list. To do this, choose Select Folder… in the Appearance popup of the Actions palette then select a folder that's saved on your hard disk containing the graphics you wish to use.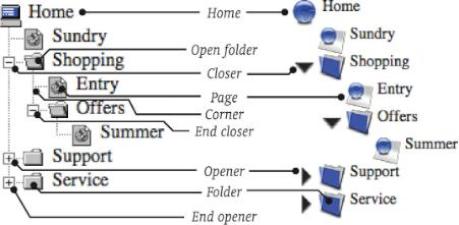
The graphics inside the folder must have the file names of:
- home.gif, home.jpeg, or home.png (for the "home" graphic)
- opener.gif, opener.jpeg, or opener.png (for the "opener" graphic)
- closer.gif, closer.jpeg, or closer.png (for the "closer" graphic)
- endopener.gif, endopener.jpeg, or endopener.png (for the "end opener" graphic)
- endcloser.gif, endcloser.jpeg or endcloser.png (for the "end closer" graphic)
- branch.gif, branch.jpeg, or branch.png (for the "branch" graphic)
- corner.gif, corner.jpeg, or corner.png (for the "corner" graphic)
- folder.gif, folder.jpeg, or folder.png (for the "folder" graphic)
- openfolder.gif, openfolder.jpeg, or openfolder.png (for the "open folder" graphic)
- page.gif, page.jpeg, or page.png (for the "page" graphic)