Types of trigger
The following types of trigger are all covered in detail in the Softpress KnowledgeBase (see the link after each Action heading).Rollover
http://www.softpress.com/kb/questions/326/By far the most common trigger is a Rollover. These are usually (but not exclusively) graphic items which can be set to trigger a specific target by choosing the number of the target in the Parameters tab of the Rollover Action palette. Although Rollovers are often used as graphics which swap images on mouseover and/or on click, they are also sometimes used as a single graphic so they simply function as a trigger only.
Text Rollover
http://www.softpress.com/kb/questions/327/Using the Text Rollover Action it is also possible to use HTML text to set up a trigger in the flow of some text.
Sequence Timer
http://www.softpress.com/kb/questions/329/Using the Sequence Timer Action you can set up a sequence of images which appear in a particular order, and this is can be set to happen on page load or “on trigger” by clicking on a Play/Pause button.
Random Triggers
Using the Random Rollover Action (see http://www.softpress.com/kb/questions/328/) or the Random Sequence Action you can set up a rollover to trigger the display of a random image from a given list of images or you can set it up to work on page load by using it in conjunction with the Sequence Timer Action. The Random Sequence Action works in a similar way so that you can play a set of images in a random order. Note that both random options occasionally display the same item more than once in a row because the algorithm that the Actions runs treats each item completely randomly. These will not be covered in this article.Types of target
The following types of trigger are all covered in detail in the Softpress KnowledgeBase (see the link after each Action heading). Freeway Express can only use graphic items as Target Items.Target Image
http://www.softpress.com/kb/questions/332/By setting up a stack of graphic items, the Target Image Action can be used to display each graphic when its target number is triggered. As the items in the stack need to combine with each other for the functionality to work, this will not work if layer items are used to create the targets on the page.
Target Show/Hide Image
http://www.softpress.com/kb/questions/333/In Freeway Express the Target Show/Hide Image Action will not let you trigger the display of Target Image items which are used in a stack (or slightly overlapping). The main difference between this Action and the Target Image Action is that it can be used to trigger the display graphic items which are placed independently on the page so they are not overlapping. This Action also lets you set up an image so it can be toggled on and off by clicking on the trigger.
Triggering Targets with a Rollover in Freeway Express
Using a rollover to trigger one or more targets using the Target Image Action
The most commonly used trigger is the Rollover. The best way to learn is to try it out yourself as you read through this tutorial - so create a new Freeway file so you can follow the steps below.Throughout this tutorial you will see links to pages contained in a Freeway 6 Express file which is live online. If you want to download that sample file, visit the Home page of the site and click on the download link at the foot of the page.
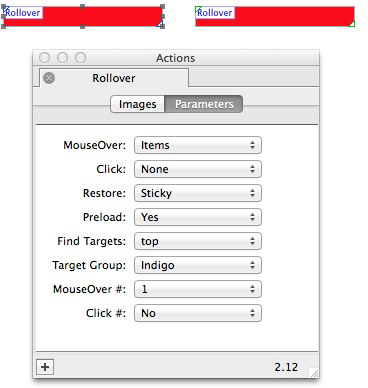
First thing to do is to click on the Graphic tool button on Freeway’s Tool Bar, draw a graphic item on the page and set the Background color to Red. As mentioned earlier, a rollover does not have to be a graphic which swaps images on mouseover and/or click - so to save time, we’ll just draw a single graphic rectangle on the page and then, with the item selected, make it a rollover by going to Item>Actions and choosing Rollover.
In the Rollover Action palette, click on the Parameters tab to see the options in the screenshot below.
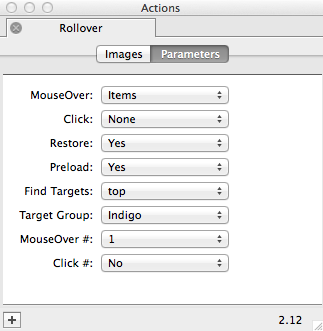
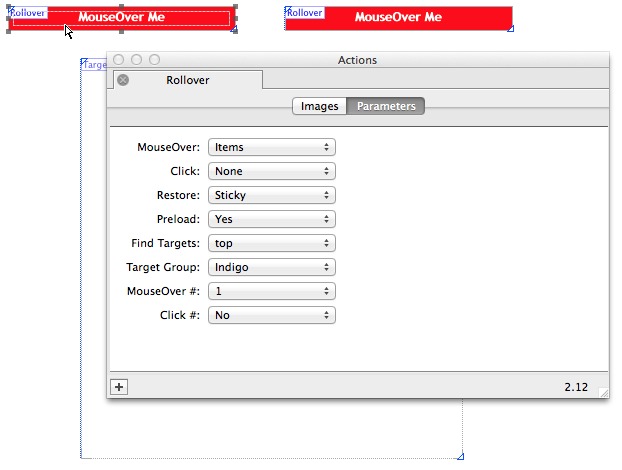
Click on the MouseOver popup and choose Items then click on the Click popup and choose None. This will mean that the rollover will be set to trigger a target on MouseOver but not on Click. Near the bottom you need to click on the MouseOver # popup and choose 1, then click on the Click # and choose None. We need to do this because we have chosen to trigger the display of an item with a target number of 1 on mouseover (so a specific target number needs to be chosen for MouseOver # only). The Actions palette should now look like the screenshot below.
Now let’s place a graphic on the page to use as a target. Click on the Graphic tool button on Freeway’s Tool Bar and draw a large rectangle on the page below the red rollover item and set the Background color to Cyan. With the item selected, go to Item>Actions and choose Target Image.
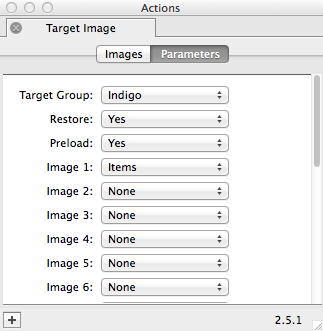
In the Actions palette, click on the Parameters tab and, if “Items” is not already chosen in the Image 1 popup click on the Image 1 popup and choose Items.
Click on the Images tab of the Actions palette and you will see that there is a checkmark in both the Normal and Image 1 columns. This will mean that on page load (which is the “Normal” state) the Target Image will be visible, and it will also be visible when it is triggered by the rollover (which is set to trigger the display of target number 1).
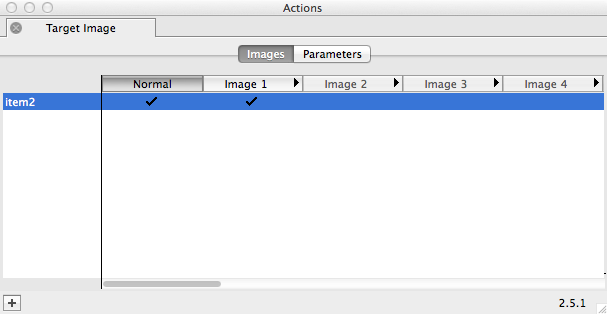
For now, we don’t want the Target Image to be visible on page load, so click on the checkmark in the Normal column (to switch it off). Note that when you do this, the green Target Image item disappears - and that is because the Normal column is selected (so its header bar displays in dark grey) which means that in the Normal state the Target Image will not display. If you click on the header bar for the Image 1 column you can check that the Target Image is set to display when the rollover triggers target number 1. You can always check to see what will display in each state by clicking on the header bar for each column in the Actions palette.
Now click on the Browser button to preview the file in a web browser.
When the page loads, all you can see in the browser is the red rollover graphic because we switched off the Normal state. However, by mousing over the rollover graphic you can see that the Target Image displays and when you move the mouse away from the rollover graphic it disappears again. The Target Image disappears again because the Restore popup in the Rollover Actions palette is set to Yes, which means that the Target Image will be restored to its Normal state when the rollover item is no longer triggered.
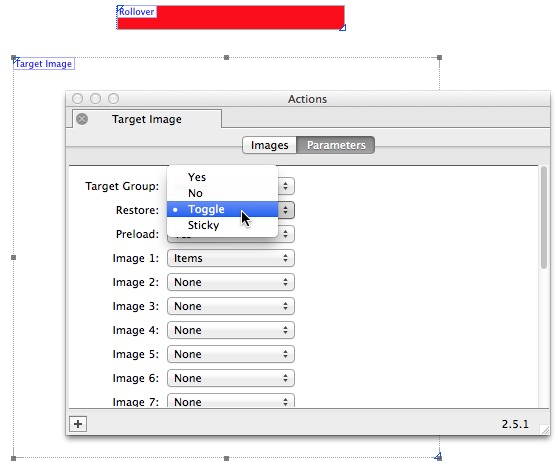
For this first example we want to make a large image display on and off by toggling the Rollover on and off - and this is done by selecting the Target Image and then choosing Toggle in the Restore popup in the Parameters tab of the Target Image Actions palette.
Preview in a browser and you will now see that when the page loads the Target Image is not displayed. Moving the mouse over the rollover makes the Target Image display, and it will still remain in view when the mouse is moved away from the rollover. However, when the mouse is moved over the rollover again, the Target Image disappears. This is because each time the rollover is triggered (on mouseover) it toggles the display of the Target Image on and off.
Another way to make a large image toggle on and off is to set the Rollover to Click (rather than MouseOver). To do this, select the Rollover on your page, go to the Parameters tab of the Actions palette, change MouseOver to None, change Click to Items, set MouseOver # to None and then Click # to 1. Before we do anything else, try clicking and holding on the Restore popup. In here you will see that the option for “Toggle” is not there (although it was there when the Rollover was set to trigger on MouseOver). The reason for this is because MouseOver actually has two triggers built into it - MouseOver and MouseOut/MouseOff (whereas Click only has one trigger) - and so when using MouseOver you need to have a specific Toggle option to prevent the triggered target item from restoring on MouseOut. Click, however, doesn’t need to use the Toggle function, and you can see that by previewing in a browser, so it will automatically toggle a single trigger and target on and off if you have the Restore set to Yes - or even No.
Now preview in a browser again and you will see that on page load all you can see is the red Rollover item, then clicking on the Rollover makes the Target Image item appear. As there is no MouseOut state for Click, the only way to switch off the display of the Target Image item is to click on the Rollover again - so you can toggle the display of the Target Image item by clicking alternately on the Rollover.
Most of the time you will be using multiple triggers and multiple targets (after all, Toggle is only useful when you have a single Target Image) and this will mean introducing the concept of a new Restore setting called Sticky. Using the same file as before we will now set things up so that there are two triggers and two targets.
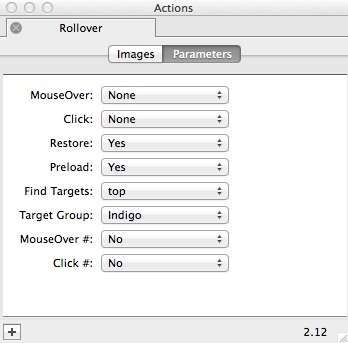
This time we’ll set each rollover to trigger the display a different target image on MouseOver (rather than on Click) - so select the rollover graphic, set the MouseOver popup to Items, set the Click popup to None, then set the Click # popup to No. In the MouseOver # popup, then choose 1. Select the red rollover graphic and then copy and paste it. This will place the new copied item directly on top of the original, so click and drag the new item to the right while holding down the Shift key to move it so there is a gap between the two items. Finally, select the right hand rollover and choose 2 in the MouseOver # popup in the Rollover Actions palette.
With only two triggers and targets it isn’t particularly difficult to work out which item is which when you work with items in the Actions palette, but when you have many more you can see the benefit of giving items logical names as you build the file so you can easily identify which item is which. Let’s do that now. Select the left-hand rollover item and look in the Site Panel. If you can’t see a list of all the items on each of the pages in the Site Panel (i.e., you can only see page names), click on the “cog” popup at the foot of the Site Panel and choose Show items. With the left-hand rollover item selected you can see its name highlighted in the Site Panel - so Alt-click on the item name in the list and enter the wording “rollover1” (without the quotes) and type a Return. Select the right-hand rollover item on the page and change the name to “rollover2”. Now select the large Target Image below the Rollovers and change its name to “target1”. With the large target item still selected, go to Item>Duplicate, leave the Number of Copies as 1, leave the Offsets to zero, then click OK. With the newly duplicated item still selected, change the Color to Magenta in the Inspector, then change its name in the Site Panel list to “target2”.
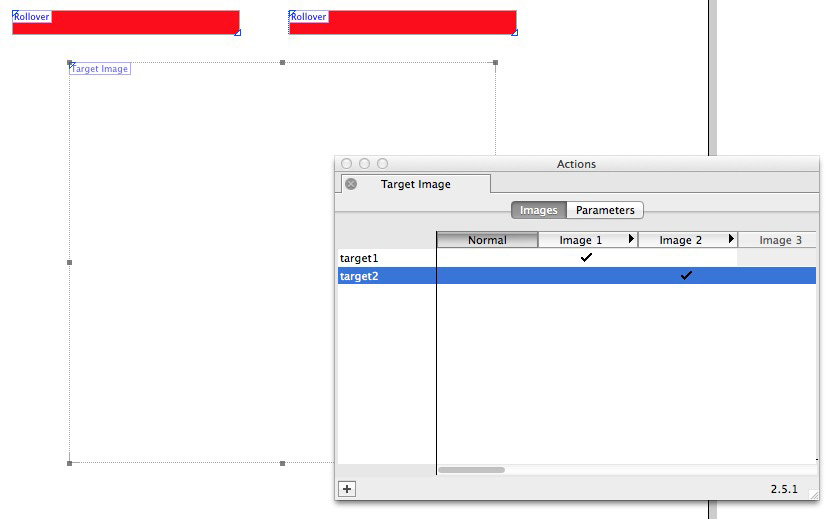
In the Images tab of the Target Image Action palette, make sure nothing is checked in the Normal column (so again nothing will be seen on page load) then set the “target1” item to be used as Image1 by checking it in that column and the “target2” item is used as Image 2. The Action palette should look the same as the screenshot below.
Go to the Parameters tab in the Target Image Action palette and change the Restore to Yes. Preview in a browser and you will see that when you move the mouse over one of the Rollovers, the corresponding large Target Image will appear and then, when you move off that Rollover the Target Image restores back to its Normal (hidden) state. Moving the mouse over the next Rollover will make the next large Target Image appear and then it will disappear when you move the mouse off the Rollover.
Although this works well, it is annoying that the triggered large target item disappears every time you mouse off a rollover. Because of this it’s best to set the Restore to Sticky so that the triggered Target Image item will remain in view until the next trigger in the same Target Group is moused over. Select each Rollover in turn then go to the Rollover Action palette, click and hold on the Restore popup and choose Sticky.
You can now preview in a browser again. This time you can see two red Rollover items, and when you mouse over the Rollovers the appropriate Target Image item displays - then when you mouse off the Rollover trigger the last displayed Target Image item remains in view until you mouseover the other Rollover.
Using this last method it's possible to set up a row (or grid) of thumbnail images that display a large version of the image on MouseOver or Click - and by using Sticky for the Restore it means that the large image will remain in view until the next Trigger item is clicked on.
Note: There is one more Restore option - and that is called None. This is only used if you want a Target Image to be triggered so it will never disappear. The only way to make a triggered Target Image to disappear when it has the Restore set to No is to refresh the web browser (or to revisit the page again without using the browser's Back button).
Important: You need to understand that there is no mouseover state on touchscreen devices - such as the iPad and iPhone - but if you use a MouseOver trigger on an item in Freeway, if the page is viewed on a touchscreen device the MouseOver will work in the same way as if it has the trigger set to Click.
Other options in the Rollover Action and Target Image Action
The Target Group setting
If you are only using one set of triggers and targets on a particular page you can simply leave this to the default setting of Indigo. If, however, you want to use multiple sets of triggers and targets on the same page then you need to be able to set things up so that each set uses one Target Group (for example Indigo) and the second set (or subsequent sets) uses a different Target Group chosen in the Target Group popup in the Parameters tab of the Action palette (perhaps Aqua, etc.). Doing this will mean that the trigger will only work with targets using that same Target Group.Preload and Find Targets
There are two other options in the Rollover Action palette which are usually fine to leave at their default settings:- Preload: By default, Freeway is set up so that all the graphic elements of the triggers are loaded before the Rollover appears on the page. This means that there will be no “lag” when a rollover uses multiple elements (ie, for the Normal, MouseOver and Click states).
- Find Targets: This is only used if you are using framesets to build your site. If you are not using framesets, leave this option to the default of Top. If your page is contained within a frameset the code can be told to start its search from the top (the outermost frameset), parent (the frameset that wraps directly around this page) or this (simply within this page itself). This can be used, for example, to set a rollover button in one frame which activates a target rollover item in another frame.
Triggering target images on click by using the Target Image Action
As mentioned earlier, triggers which are used with the Click state work in a very different way to those set to work with the MouseOver state, and this also applies when it comes to setting up multiple triggers and targets when they use the Click state. Create a new Freeway file and set up three rollovers in a row (see the screenshot below) and set them up so they use the Click state and the Click # of 1, 2 and 3 respectively.Below the row of Rollovers we need to use a stack of three Target Image items. It can be tricky at times when using multiple items in a stack, so follow the steps below which explains the simplest workflow.
Draw the first Target Image item on the page, give it a Background color of Magenta and change the Name/ID in the Inspector to “magentabox” (without the quotes). Copy and paste the Target Image item and then click and drag the newly pasted item so it isn’t overlapping (or only slightly overlapping) the magentabox item. With the new item selected, give it a Background color of green and change the Name/ID in the Inspector to “greenbox”. Copy and paste the item again and then repeat the same procedure, giving it a Background color of yellow and changing the Name/ID in the Inspector to “yellowbox”.
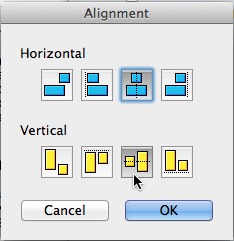
Now select all three Target Image items and go to Item>Align, click on the Align Center button for Horizontal and Vertical and click OK (see screenshot below). This will move all three items on top of each other in a perfectly aligned stack.
With all three items in the stack still selected, click and drag the entire stack into position underneath the row of Rollovers. Click on a blank area of your Freeway page or pasteboard area (to deselect the items) and then click once on the stack. Go to Item>Actions, choose Target Image and look in the Images tab of the Action palette. In here, set up the checkmarks so “magentabox” is checked in the Image 1 column, “greenbox” is checked in the Image 2 column and “yellowbox” is checked in the Image 3 column. Finally, because we want to set up this trigger and target example so it shows one of the targets on page load, add another checkmark for “yellowbox” in the Normal column. This will mean that “yellowbox” will be visible on page load (ie, when nothing has been triggered) and that each of the colored boxes will be triggered according to which Rollover is clicked on.
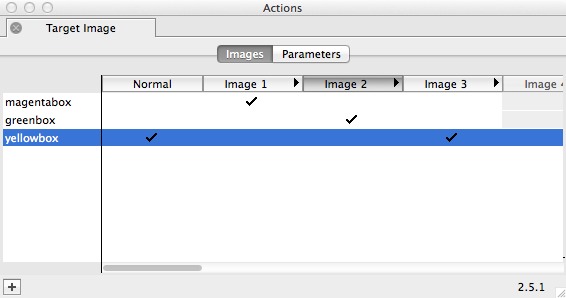
Click on the Parameters tab of the Target Image Action palette and set the Restore value to No. This always needs to be chosen when using multiple triggers and targets with the Target Image Action in the Click state in Express. Preview in a browser to see that when the page loads the “yellowbox” item is visible, then clicking on the left hand Rollover will display “magentabox”, clicking on the center Rollover displays the “greenbox” item and clicking on the right hand Rollover displays the “yellowbox” item again.
Using the Target Show/Hide Image Action in Freeway Express
At first sight the Target Show/Hide Image Action appears to do exactly the same as the Target Image Action - but there are some important differences.- It can be used to make items appear and disappear when they are not in a stack (or at least partly overlapping) which they need to do in the Target Image Action.
- It uses a very different workflow when setting up multiple targets which some users find more intuitive than using the Target Image Action.
Now draw a larger rectangular graphic item underneath the left-hand rollover which is about the same width as the rollover, give it a background color of green, then go to Item>Actions and choose Target Show/Hide Image. With the item selected, choose the options shown in the screenshot below in the Target Show/Hide Image Action palette.
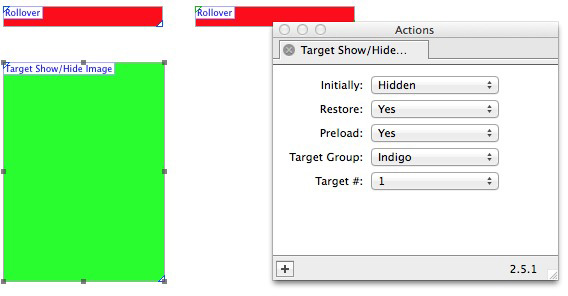
You can see that the Target Show/Hide Image Action has a far simpler interface in which to choose the target number for each item (rather than the often unwieldy Images tab of the Target Images Action). With the first target item selected, copy and paste it and then Shift-click and drag the pasted item so it is under the right-hand rollover item, change its color to cyan and then change the Target # to 2 in the Target Show/Hide Image Actions palette. Preview in a browser to see that only the two Rollovers display on the page. Click on one of the Rollovers to see the assigned Target Image item display. Click on the other Rollover to see that the Target Image item displayed earlier disappears and the other assigned Target Image item displays.
Using the Text Rollover Action as a Trigger
The normal Rollover Action can only be applied to a graphic item, so the Text Rollover Action is a valuable alternative which lets you set up a link within HTML text which can be used as a trigger.The two main limitations of the Text Rollover Action is that it can only be set to work on MouseOver (it can’t be made to work as a trigger on click) and the Restore must be set to Yes (it can’t be made to work with a Restore of Sticky).
The Text Rollover Action can be used in two different ways - as a standalone Action item on the page or as an Action item within the flow of text. To use it as a standalone Action item, make sure nothing is selected on the Freeway page and go to Insert>Action item and choose Text Rollover. This will place a new, empty item in the center of your page. With the item selected, look in the Actions palette to see the options.
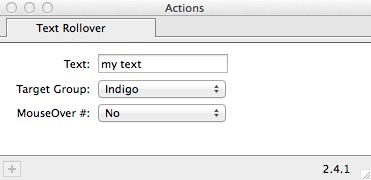
The most common way to use a Text Rollover, however, is to use it in the flow of text. To do this, click inside an HTML text item, move the flashing text cursor to the point in the text where you want the Text Rollover text to be and go to Item>Actions and choose Text Rollover. This will place an empty item in that location. It is important to note that you must enter the text you want to use for the trigger text in the Text field of the Action palette - so select the Action item and enter the text you want to display on the page and type a Return.
The Target Group option is the same as with the standard Rollover Action and as you can see there is only a MouseOver # option which is set to No by default, but which you can set any Target Number between 1 and 20. It is important to note that although iOS devices (such as the iPhone and iPad) are touchscreen devices which have no MouseOver state, Freeway will default to a Click state when the page is viewed on those devices.
Because the trigger text is a hyperlink, the text will automatically use the hyperlink states set up for the page, otherwise it will use the defaults of blue underlined text in its Normal state and red underlined text when clicked. If you want to use different color and underline behavior for each state, set that up in the Links panel in the Inspector’s Paintbrush tab when nothing is selected on the page or select the HTML text in which the Text Rollover items are being used and apply the Text Link Style Action to the item.
When used in the flow of text, the Text Rollovers will pick up the surrounding text styling (which in this case is 13px Trebuchet MS). Because Text Rollovers are very similar to hyperlinks, if you want to control the color and underline behavior of the link text you need to do that by making sure nothing is selected on the page, going to the Paintbrush tab then opening the Links panel where you can choose options for the color and underline behavior for each link state. Alternatively, you can select the HTML item which contains the Text Rollovers and then apply the Text Link Style Action (which will mean that any existing links styles can be overwritten for just that item).
For this example, the Target Images have a Restore value of Yes, which means that because no item is used in the Normal column in the Images tab of the Target Image Action palette, the triggered target item will disappear when the mouse is moved away from the Text Rollover item. If you want an item to remain in view until the next Text Rollover is triggered, you need to set the Restore values to Sticky for each of the Target Image items.
Using the Sequence Timer Action to trigger the display of Target Images
The Sequence Timer Action is a Page Action which can be used to automatically trigger the display of target items on page load (ie, without needing to be triggered by a rollover or other trigger) in a pre-determined sequence. This Action will work with both the Target Image Action (to display graphic items arranged in a stack on the page) and the Target Show/Hide Action (to display graphic items which are not overlapping or stacked on top of each other).To show you how to set up a fading slideshow using the Sequence Timer Action create a new Freeway file or set things up on a new page. First thing to do is to make sure nothing is selected on the page and go to Page>Page Actions and choose Sequence Timer. With nothing selected on the page the Actions palette will show the options available.
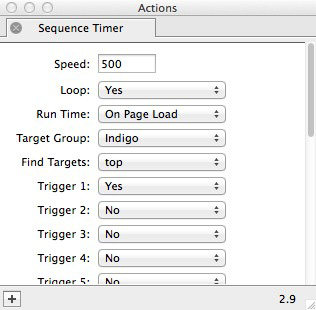
The option for Speed is measured in thousandths of a second (so the default of 500 means each image will remain in view for half a second before the next image is triggered). For our example, set the Speed to 1500, which will mean that each image will be visible for one-and-a-half seconds. The next option is Loop, which is set to Yes by default, and this will mean that the sequence will repeat over and over. If it’s set to No, the sequence will run once and then stop. Leave it set to Yes.
The Run Time option gives you the choice of “On Page Load” and “On Trigger”. On Page Load means that the sequence of images will start on page load without anything needing to be triggered. The On Trigger option will be covered later, so leave it to the default of On Page Load for our example.
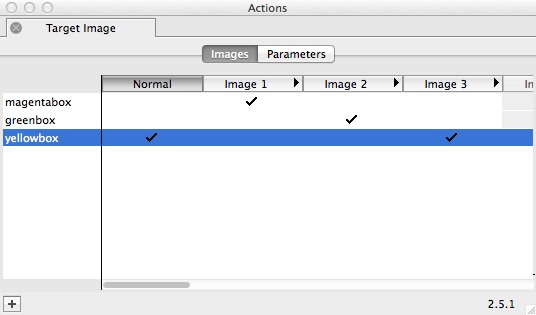
Now draw a new item on the page, apply the Target Image Action to it, and set the background color of the item to magenta and change the Name/ID in the Inspector to “magentabox” (without the quotes). Copy and paste the item then, with the item still selected, change the color to green and give it the Name/ID of “greenbox” in the Inspector. Copy and paste once more, apply a color of yellow and give it the Name/ID of “yellowbox”. Now set up the Images tab of the Actions palette so “yellowbox” is checked in the Normal and Image 3 columns, “magentabox” is checked in the Image 1 column and “greenbox” is checked in the Image 2 column.
Finally, click on the Parameters tab of the Target Image Action palette and set the Restore to No. It is important to note that the Sequence Timer Action will not work in Freeway Express with the Restore value of the Targets being set to anything other than No.
Because three Target Images are being used in the sequence, you now need to make sure nothing is selected on the page (so you can see the Sequence Timer Action palette) and then set Trigger 1, Trigger 2 and Trigger 3 to Yes. For the Action to work correctly it must be set so the number of trigger popups set to Yes match the number of Target Images.
Now that everything is set, preview the page in a browser to see that the yellowbox item displays on page load and then the images load in sequence and repeat over and over.
Using the Play/Pause Sequence Timer Action
This Action gives you some more options to control the sequence of images displayed by the Sequence Timer Action. It can only be applied to a graphic item, so draw a graphic item on your page and give it a background color. You can then select the item and go to Item>Actions and choose Play/Pause Sequence Timer.There is only one option in the Action palette, and that is to set the Trigger Type to On Click or On Mouse Over. On Click means that if the Run Time option in the Sequence Timer Action palette is set to On Trigger, the sequence will not start on page load - it will not start until the graphic which has the Play/Pause Sequence Timer Action applied is clicked on. On Mouse Over works the same way, but on MouseOver rather than click.
If the Run Time option in the Sequence Timer Action palette is set to On Page Load, the sequence will run automatically when the page appears in the browser - but at any time the graphic with the Play/Pause Sequence Timer Action applied can be clicked on or moused over to pause the sequence (and then the sequence can be toggled on and off with subsequent clicks or mouseovers).