What the Action can do: This Action lets you do the following:
- It lets you offer video reliably so it plays in all modern browsers and devices on Macs and PCs.
- It lets you offer video content in the latest HTML5 format.
- It lets you offer the video with a "fallback" version so browsers which do not support HTML5 will show the movie in Flash.
Before you use the Action, first make sure you have a movie file saved as an .m4v or .mp4 file in H.264 video compression. This is the current common standard for video offered on the web, and it is important to note that you can't simply use QuickTime .mov files with this Action. If you have a .mov file, open it in QuickTime Player then go to File>Export To>Web… then choose the compression you want to use for the movie. Cellular will give you the smallest file size, then Wi-Fi, and Broadband will give you the largest file size. The larger the size, the better the quality - but it will also take longer to load in the visitor's browser.
Note that there are many options in the Output Settings tab of the Inspector which control how the movie appears, whether the Controller is set to display, etc.
To use the Action, either drag and drop a (.m4v or .mp4) video file onto your page (which will automatically size the item to the size of the movie, but you can resize it to suit if you wish) or draw an HTML item on the page and go to File>Import to import your video file. With the item selected on the page, go to Item>Actions and choose Video Extras. With the item still selected you will see the options in the Actions palette:
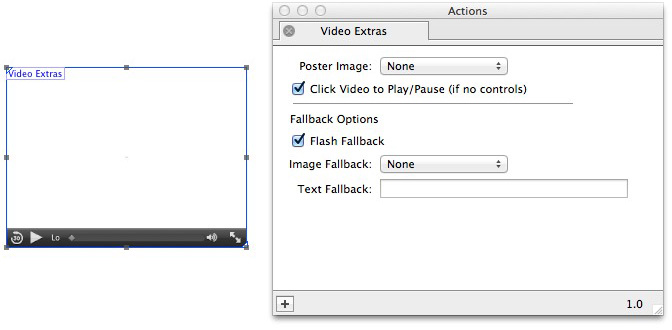
- Poster Image: Add a poster frame (which will be an initial image that shows on page load before the Play button is clicked on). This will only be used if the "Autoplay" option is not switched on in the Output Settings tab of the Inspector when the item is selected.
- Click Video to Play/Pause (if no control): Makes the video clickable to play or pause the movie if Controls are switched off in the Output Settings tab of the Inspector.
- Flash Fallback: There are three levels of "fallback" which are used in order should HTML5 not be supported in the visitor's browser or if the video codec required for the movie file is not installed on the visitor's computer. The first Fallback will be to play the video using Flash. If Flash is not available an image will be displayed. If Images are turned off in the visitor's browser preferences, a line of text will display inside the item. We recommend you leave this option checked at all times.
- Image Fallback: Choose the image you wish to offer as an image fallback in this popup.
- Text Fallback: Enter the text you wish to display instead of the movie or image in this field.