What the Action can do: This Action lets you do the following:
- It lets you create an interactive column of navigation links, complete with page folders with open/close buttons to show the hierarchy of pages within those folders.
Creating a simple Navigation Map
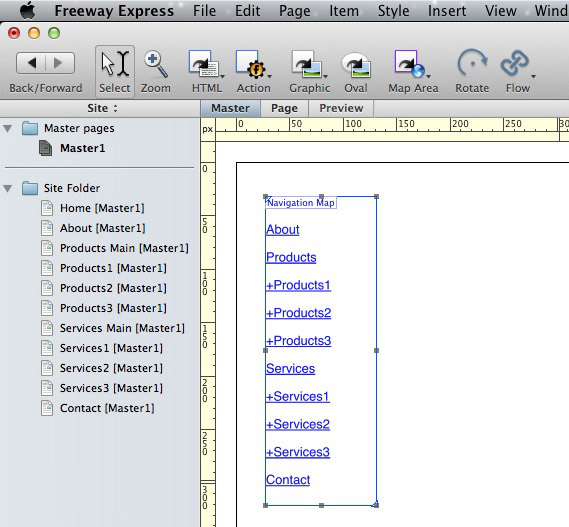
The Navigation Map Action is applied to HTML items. The folders and pages that are in the Navigation Map are defined by the text within that item.- Draw an HTML item on your Freeway page.
- With the item selected, go to Item>Actions and choose Navigation Map.
- With the item selected, look in the Actions palette to see the options
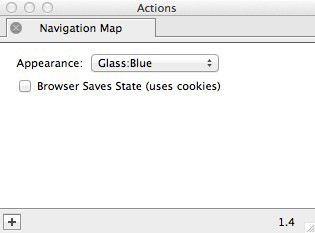
- Appearance: Lets you choose from a set of predefined "themes" for your Navigation Map panel on your page (or lets you select a set of custom images you have ready for use).
-
Browser Saves State: Switch on this option if you want the Navigation Map remember which page folders were left open the last time you used the Navigation Map panel on your page. This requires that a "cookie" is set in the browser to remember that last-used state.
The hierarchy is defined by prefixing the text by one or more “+” signs. To have a folder with items in it prefix the contained items with a “+” immediately after the item you want to use as a folder. If the contained items themselves contain items then prefix the doubly contained navigational items with two “+” characters.
Style the text appropriately and then apply hyperlinks to the text in the item. The screenshot below shows a single level of pages and folders in the Navigation Map (although no real page folders have been used in the Site Panel).
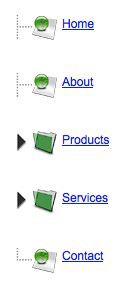
In order to see your Navigation Map, preview your page in a browser. You can preview in Freeway, but this does not currently support hyperlinks. In the browser, use the disclosure triangles to see the pages inside a particular page folder. See the screenshots below to see the "closed" state for page folders (left) and the "opened" state of the page folders in the Navigation Map list.
Preserving the state of the menu
A visitor to your site can, by clicking the disclosure controls, open and close portions of the navigation hierarchy so that just the area of interest is visible - and the Navigation Map provides a means by which this can be preserved (though you need to be aware that a cookie needs to be set for this to work. This can be desirable as reloading the page in the browser, or moving to a different page that also has a navigation Action will cause the Navigation Map to collapse back to its original state.To set this up, check the Browser Saves State option in the Actions palette.
Defining a custom set of images
It is possible to create tree menus of your own design by creating a set of web-ready graphics which are appropriately named. The following diagram shows the images that are used in “Seattle” and “Glass”, two of the appearances that are installed with the Action. 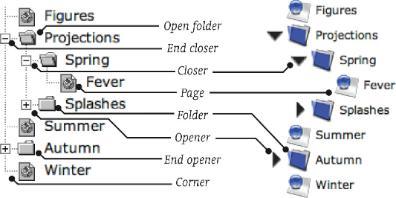
Not all images are required in an appearance. For example the “Glass” style makes no distinction between open and closed folders. It does not have corner or line graphics. The Navigation Map will use the graphics that are available and will substitute or omit those that are not.
Create GIF, JPEG, or PNG images, using the following naming convention:
- Opener: opener.gif, opener.jpeg, or opener.png
- Closer: closer.gif, closer.jpeg, or closer.png
- End Opener: endopener.gif, endopener.jpeg, or endopener.png
- End Closer: endcloser.gif, endcloser.jpeg, or endcloser.png
- Branch: branch.gif, branch.jpeg, or branch.png
- Corner: corner.gif, corner.jpeg, or corner.png
- Branch: branch.gif, branch.jpeg, or branch.png
- Folder: folder.gif, folder.jpeg, or folder.png
- Open Folder: openfolder.gif, openfolder.jpeg, or openfolder.png
- Page: page.gif, page.jpeg, or page.png.