Type of Action: Standalone Action (to use it, either click and hold on the Freeway tool, choose the Action from the list and draw an item on the page OR go to Insert>Action Item and choose the Action from the list).
What the Action can do: This Action lets you do the following:- It lets you create a mouseover trigger which can be used on HTML text
The text which is used in the Text Rollover Action item needs to be entered in the Actions palette.
As this is a standalone item and it uses text inside it, the recommend workflow for working with this Action varies depending on how you want to use it - so the most common methods are dealt with in separate sections below.
Using a Text Rollover in the flow of text
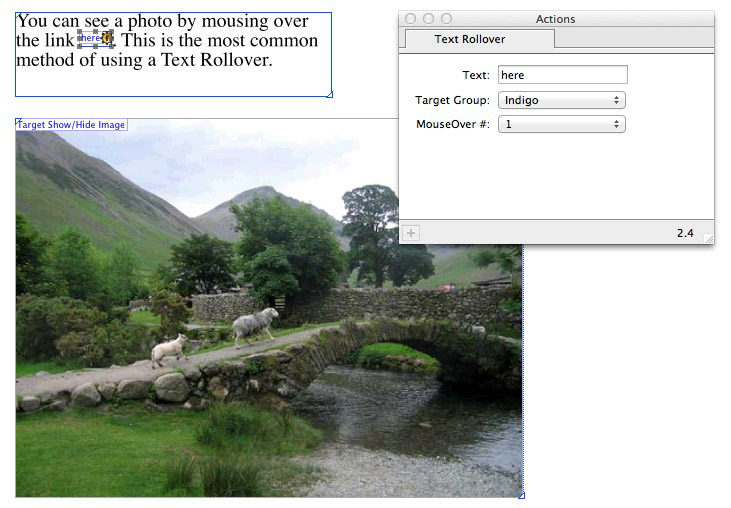
The most common use of a Text Rollover is to place the item inside the flow of text inside one of your HTML items on your page.
- Draw an HTML item on your page, enter some text (remembering that the text used by the Text Rollover itself will be entered in the Actions palette)
- Click inside the text where you want to use the Text Rollover, go to Insert>Action item and choose Text Rollover
- With the item selected within the text, look in the Actions palette to see the options.

- Text: Enter text in this field for the text you want to display as the Text Rollover on your page within the text flow. The default text in this field is "my text" - so change it to the text you would like to use.
- Target Group: As with all trigger and target Actions, you can use multiple trigger and target groups on the same page, so you can leave this as the default of "Indigo" if you are using just one trigger and target group on your page. If you use different trigger and target groups, each group will need to have a different Target Group set so the correct target is triggered by the Action.
- MouseOver #: Click and hold on this popup to choose the target number of the Target Image, Target Show/Hide Image or Target Show/Hide Layer item you want to trigger when the Text Rollover is moused over.
Using a Text Rollover as a standalone item
If you want to use a Text Rollover as an item which is on its own on the page (ie, it is not within the flow of text) you need to make sure nothing is selected on the page, go to Insert>Action item and choose Text Rollover. This will place an item with the default dimensions of 100px square on your page - so resize it to the size you want.With the item selected within the text, look in the Actions palette to see the options (which are exactly the same as using the Action within the flow of text).
Styling a Text Rollover item when it is used as a standalone item
As with all standalone Actions, Freeway will publish the item so the text used in the Text field will be in Freeway's default styling of Times New Roman in the Default size. If you want to use custom styling on it to match the rest of the look of text on your page, you need to use a slightly different workflow.- Draw an HTML item on the page
- Click inside the item (so you can see the flashing text cursor inside it)
- Type a space
- Go to Insert>Action item and choose Text Rollover
- Type another space
- Go to Edit>Select All (to select both spaces and the Action item)
- Apply the styling you want to use by specifying a font, size, etc., in the General Settings tab of the Inspector
It is important to note that you shouldn't choose a colour for the text inside the Action item - this will always pick up the link styles which are applied to the page (see below).
Note, however, that Freeway Pro users do not need to use this method - they can simply create a new custom text style, select the standalone Action item on the page and apply the style to the item in the Styles tab of the Inspector or in the Styles & Colors palette.
Changing the color and underline attributes of the Text Rollover's link styling
As mentioned earlier, the text within the Text Rollover item will use Freeway's default link styles for each of its link states. If you want to use custom colors or custom underline behaviour for the link states, you need to set this up in the Paintbrush tab of the Inspector.- Make sure nothing is selected on the page and go to the Inspector's Paintbrush tab
- Open the Links panel at the foot of the Inspector by clicking on the disclosure triangle
- Choose the colour and underline behaviour you want to use for each state