Type of Action: Item Action (to use it, select an item and go to Item>Actions to choose the Action from the list).
What the Action can do: This Action lets you do the following:
- It can create a graphic on your page which swaps to another image on mouseover
- It can create a graphic hyperlink which swaps on mouseover to give the visitor a visual cue that they are mousing over a hyperlink
- It can create a graphic button which triggers an “event” (such as the display of an image elsewhere on the page)
Perhaps the most common of all Actions is the rollover. Rollovers are graphic items which change to display a different graphic in each of the “normal”, “mouseover” and “click” states when the page is previewed.
Rollovers can be made to simply swap images when moused over, but they can also be used as a visual cue that something is being moused over so it can be used as a link, and another common use of rollovers is to use them as a “trigger” so they trigger an “event” such as displaying a large image on a different part of a page when a thumbnail image is moused over or clicked.
To make a rollover in Freeway you need to build a stack of items on your page and then apply the Rollover Action to the stack. In the Rollover Actions palette there are two main windows which are chosen by clicking on the “Images” and “Parameter” tabs near the top of the palette. The “Images” window is where the different elements of the rollover are chosen to appear in each state of the rollover, and the “Parameters” window is where the behavior of the rollover (such as whether it restores back to its default when moused off) is controlled.
Simple rollovers which swap images on mouseover can be very quickly created in Freeway (Note: Pro users should make sure the CSS Layout button is switched off on Freeway’s tool bar):
- Click on the Graphic tool in the tool bar, draw a wide rectangular item on your page, then apply a red background color in the Inspector.
- Control-click (or right-click) on the item and choose Duplicate from the contextual menu. Set the values of 1 for copies and 0px for horizontal and vertical offsets, click OK and then apply a green background color.
- With the topmost item selected, choose Item>Actions and select Rollover. If you can’t see the Rollover Action in the list of Actions, you probably have an HTML item selected (rollovers must be graphic items).
- In the Actions palette (the Images window shows as default), click on one of the check marks in the Normal column to remove it and click once in the MouseOver column to create a check mark.
- You can see which item will show for each state by clicking once on the bar at the top of each column. Preview the file (or preview in a browser) to see that the rollover changes color when you move the mouse pointer over it.
The above step-by-step creates the most simple rollover possible.
Instead of duplicating items, we could also have copied and pasted the different elements of the rollover, edited them separately in different areas of the page and then aligned them into a stack using Freeway’s Align feature. Whichever route you take, the principle is still the same - the items must be on top of each other and then both items will be shown in the list of items on the left of the Actions palette.
You can use any graphic item in Freeway as part of a rollover, regardless of its content, so you can use graphic text items or graphic items into which you have imported an image.
If you want to use a rollover which changes its background color on mouseover but the text on top stays the same, you can build your rollover in two different ways.
- You can enter the text as graphic text within the different elements so the text appears on all the elements which make up the rollover; or
- You can use a separate graphic text item on top of the colored background items. If you use this method, you will need to use a checkmark in all columns of the Actions palette (so it is checked in all states).
Rollover options in the Actions palette
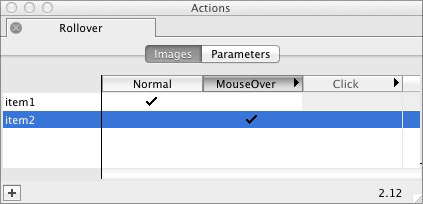
In the step-by-step above we used only default settings with the exception of the placing of check marks in different columns. Let’s run through the various options available in the Actions palette—first we’ll look at the options in the Rollover Action’s “Images” window.- The Images window has a table-based layout—a list of all the items in the rollover on the left and a column for each of the Normal, MouseOver and Click states.
- You don’t need to use all three states, many times you’ll use just Normal and MouseOver.
- A check mark in an item’s row for a particular column signifies that the item will be visible in that state. Where there is no check mark, the item will be invisible. Click on a blank area of the table to generate a check mark, click on an check mark to remove it.
- If you want an item to display in all states—for instance a graphic text item displaying the name of a rollover hyperlink—you should check each column.
Now let’s look at the options in the “Parameters” window, which is a list of pop-up menus:
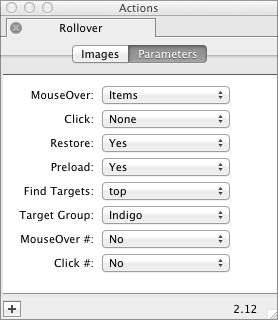
- MouseOver: This pop-up controls the mouseover state. Off means there is no mouseover state, and Items means use the items specified for the mouseover state in the images window. You can also choose Select, which allows you to select a graphic from your computer’s hard drive for the mouseover state.
- Click: This menu works in the same way as the MouseOver menu but for the Click state.
- Restore: This pop-up menu controls whether the rollover restores back to the Normal state when the mouse is moved away from the rollover. Yes displays as default. If you set it to No, the image will only return to its Normal state when the page is revisited or reloaded. Setting the menu to Sticky retains the MouseOver or Click state until you mouseover another rollover on the page.
- Preload: By default, this pop-up menu is set to “Yes”, which means that all the graphics of the rollover will load into the browser’s cache before the rollover is displayed. This makes the transition from one state to another much smoother as the graphics for each state don’t need to load when the transition is made.
- Find Targets: This pop-up menu is only used when your page is a “frameset” and you need to control which frame the targets appear in.
- Target Group: When using the Rollover as a trigger, you can set different groups of targets to be triggered when a different trigger is activated. Target Groups have color names (such as Indigo and Cobalt). Indigo is the default target group.
- MouseOver #: When using a rollover as a trigger, this sets a specific target number (which corresponds to an item’s target number in that target’s Action palette) to appear when the rollover is moused over.
- Click #: This menu works in the same way as the MouseOver # menu but sets a specific target number to be triggered when the rollover is clicked.
The recommended method of making reliable rollovers
Although you can see that creating a rollover can be done very quickly and easily, there are some issues with making rollovers this way if you are going to use those rollovers as hyperlinks (which is very common). The main issue is that Safari has a bug in it which displays a blue outline around all rollovers with a hyperlink (though this doesn’t happen in other browsers). Another issue is when you want to use the rollovers in a Freeway Pro file where you want to use all items as layer items, as layer items cannot be made to “combine” with each other.We strongly recommend that you create the rollover as normal and then group the elements of your rollover before applying the Rollover Action to the group item. You can can see how to build a rollover this way in the movie tutorial at http://www.softpress.com/support/tutorials.html (called “Table-Based Rollover That Can Be Used As A Layer”). Building your rollovers this way will make your rollovers work reliably in all browsers so it is worth the extra time to do so.
Common queries with rollovers
Softpress Support often gets queries from new users who can’t get their rollovers to work. Let’s look at some of these queries and their simple solutions:----------------------------------------------
Why don’t the different elements of my rollover appear in the rollover Action dialog?
Solution 1: For rollovers to work, the elements must be set to “combine” with each other. Select each element in turn and make sure that Combine Graphics is checked in the General tab of the Inspector.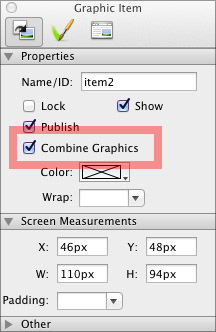
----------------------------------------------
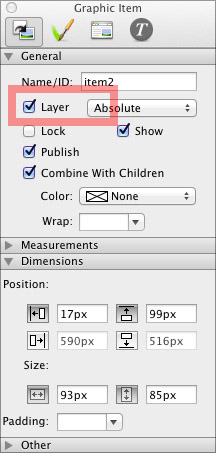
Why are items appearing in the rollover Action dialog that I don’t want for my rollover?
Solution: By default, Freeway will set all touching or overlapping graphic items to “combine”, so if your rollover items are on top of another graphic item, this will appear in the list of images in the rollover Actions palette along with any other graphic items combining with it. You need to select the background graphic item then uncheck the Combine Graphics checkbox in the General tab of the Inspector. The background graphic item will appear in the list but it will now be greyed out.----------------------------------------------