A “carousel” is a slideshow where the images slide into view (either from the side or from the top or bottom) and the sequence can be made to be self-running or triggered by buttons or tabs. It’s very quick and simple to create a carousel in Freeway using the Carousel suite of Freeway Actions.
The screenshots in this article are of the original Carousel Actions. Although the Carousel 2 Actions may have slightly different options, the functionality is mainly the same. The main difference with the Carousel 2 Actions is that you can choose “Wrap around” to make it so that clicking next on the last slide takes you to the start of the slideshow again rather than snapping back to the first slide as it does in the original Carousel Actions.
You will need to download the Carousel suite of Actions from ActionsForge - but please be aware that the original Carousel Actions only work with FW5 or FW5.5 - if you want to use FW6, you should use the Carousel 2 Actions (the original Carousel Actions are at http://www.actionsforge.com/actions/view/15-carousel and the Carousel 2 Actions are at http://actionsforge.com/actions/view/283-carousel-2) because they are not included in the core set of Actions installed in Freeway. The suite is contained within a single Action “bundle”, and by installing it you will install all the Actions in the suite. Make sure you have the latest version, as the suite has regular updates.
Before we run through the steps for setting up a carousel, you will need to have four or more images ready to import. Depending on how you like to work with imported images, these can be imported as normal graphic items (as in the steps below) or - if image quality is particularly important - you might want to use “pass through” images which have been scaled, cropped and optimized beforehand in Photoshop or equivalent. You can read about using pre-optimized images in the KnowledgeBase article at http://www.softpress.com/kb/questions/82/.
After downloading and installing the Action bundle, go to your Freeway file or create a new file and then make sure you switch on the CSS Layout button on Freeway’s toolbar (so it displays in blue). With the CSS Layout button switched on, every item you draw on the page will be a Layer item - which they need to be for the Actions to work.
Draw a graphic item on your page and go to File>Import to import the graphic you want to display on page load (ie, the first image in the carousel slide sequence). Crop and scale the image to suit, then go to Item>Actions and choose Carousel. In the Actions palette there are three options - see the screenshot below.
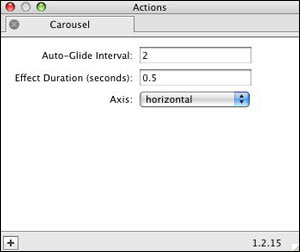
By default the Auto-Glide Interval field is empty, which means that the carousel will not be self-running (ie, it will only work by clicking on buttons or tabs to display another image). To make a self-running carousel slideshow, set the Auto-Glide Interval to the time (in seconds) you want to use. The Effect Duration (seconds) field controls the speed of the sliding transition to the next image. The Axis popup controls the direction of the sliding transitions, and this can be set to Horizontal (the default) or Vertical.
The item which has the Carousel Action applied needs to be positioned where you want the carousel slideshow to appear on your page - the rest of the images can be placed on the “pasteboard” area (ie, off the page area).
Select the item with the Carousel Action applied and go to Item>Duplicate, leave the Number of Copies to 1 and set both offsets to 0px. Click and drag on the new item and position it off the page area then remove the Carousel Action by clicking on the “X” on the Carousel tab in the Actions palette. Import the next image you want to use in the carousel slideshow and then go to Item>Actions and choose Carousel Pane. In the Actions palette there is just one option (see screenshot below).
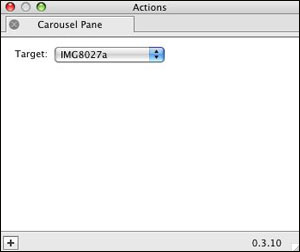
If you only have one carousel on the Freeway page, the Target popup will automatically be set to the name of the item which has the Carousel Action applied (by default, this will be named after the image you imported). If, however, you are using more than one carousel on the page you will need to choose the specific Carousel Action item so it “targets” the correct one. By clicking on the Target popup you will see a list of items which have the Carousel Action applied on that page, but for this tutorial, it can be left as it is.
Shift-Alt-drag the Carousel Pane item (to create a copy of the original) then import the next image into the new item. Repeat this process to create as many Carousel Pane items as you want to use for your carousel slideshow.
Now preview in a browser to see the carousel working. This is just a simple self-running carousel and you will see that it runs through the sequence of images until it reaches the end, and then it slides back quickly to the beginning of the sequence and repeats. You can see how I’ve set it all up in Freeway by downloading and opening the file inside the archive folder attached in a zip file below this article.
Using Previous/Next Buttons to control the carousel
If you want to have manual control over the carousel, it can be set it up so the visitor can click through the sequence using Next and Previous buttons. Note, however, that if you click Next when viewing the last image in the sequence, this will make the carousel slide back quickly to the start again (and the same happens if you click on Previous when viewing the first image of the sequence) - whereas all other transitions are simple sliding transitions to the next image.It is possible to set the carousel to be self-running as well as offering Next and Previous buttons, but this may make it behave strangely - so we recommend that you remove any value (if any) that has been entered in the Auto-Glide Interval field of the Carousel Actions palette first.
Create two graphic text buttons on the page, one using the text “Previous” and the other using “Next”, then place them either side of the item with the Carousel Action applied. Select the Previous item, go to Item>Actions and choose Carousel Button. In the Actions palette there are two options - see the screenshot below.
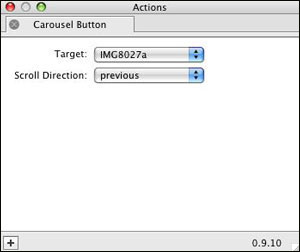
The Target popup works in exactly the same way as the one in the Carousel Pane Action. The Scroll Direction lets you choose from Previous or Next to control the direction of the sequence. For the Previous button, this can be left to the default of Previous.
Select the Next graphic item and apply the Carousel Button Action, but this time choose Next in the Scroll Direction popup.
Preview in a browser to see that you can now click through the carousel slideshow sequence one image at a time in either direction.
Using Tabs to control the carousel
Another way to let the visitor view the images within the carousel slideshow is to offer tab buttons so they can click on a specific tab to display that particular image. To do this you need to start with a basic carousel (ie, without the Next and Previous buttons - although they can still be made to work in addition to the tabs) and again we recommend that the Auto-Glide Interval value is set to be blank in the Carousel Action palette.Create a graphic text item on the page, click inside it and type “Tab 1”. Select the item, go to Item>Actions and choose Carousel Tab. There is just one option in the Actions palette - see the screenshot below.
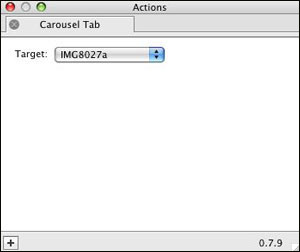
Unlike the Carousel Pane and Carousel Button Actions, the Target popup here needs to be set to choose the specific image you want to display within the Carousel when that particular Carousel Tab item is clicked on in a browser. If you click and hold on the Target poup you will see a list of all the Carousel Pane items as well as the original Carousel item - so choose the image you want to display when that Carousel Tab item is clicked on.
Shift-Alt-drag the Carousel Tab item, click inside it and change the text to “Tab 2” then choose the image you want to display when that item is clicked on in a browser. Repeat this procedure to create Carousel Tab items for each of the images in the carousel slideshow.
Preview in a browser to see it working and you will see that clicking on “Tab 1” and then “Tab 2” the carousel slides from one image to the next - but if you click from “Tab 1” to “Tab 4”, the image transitions quickly through the “Tab 2” and “Tab 3” images to display the “Tab 4” image.
If you download the attached zip file (below this article under “Attachments”), you can get one of the Freeway file I’ve created which has three pages - the first page shows a self-running carousel, the second page shows a carousel controlled by previous and next buttons, and the third page shows a carousel controlled by four different tabs. Note that for the third page I’ve set the Axis in the Carousel Action to Vertical so that the images slide in from the top or bottom rather than from the sides. If you use FW5.5 or earlier, download the “carousel_sample (FW5.5 and earlier).zip” file; if you use Freeway 6, download the “carousel2_sample (FW6 and later).zip” file.
You might need to re-link to the original resources in the file if you can’t get the file to work correctly when you preview it in a browser. To do this, go to Edit>Resources, select the first file flagged as “Missing”, click Edit, click Locate and then relink to the original resource file located in the Media folder of the folder of files you downloaded from the link below.
carousel_sample.zip (1.2 MB)