It is very simple to create a graphic item in Freeway by using the Fill Master Action.
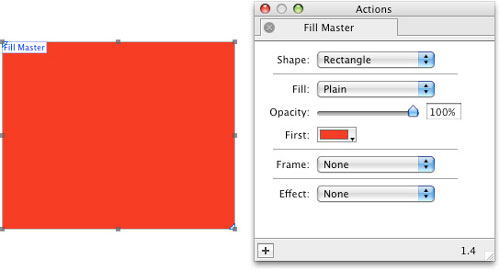
Draw a graphic item on the Freeway page and go to Item>Actions and choose Fill Master. With the item selected you will see the options in the Actions palette (if you can’t see the Actions palette, go to Window>Actions). The default options are shown in the screenshot below.
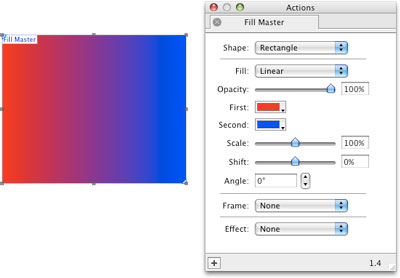
By far the most common type of gradient is a “linear” gradient which changes from one color to another. To do this, click on the Fill popup and choose Linear. As soon as Linear is chosen you will see that Freeway applies a default horizontal gradient of red (on the left) blending to blue (on the right). See screenshot below.
There are many options, but the most commonly used ones for making a simple gradient graphic are:
Opacity: Note that this controls the level of transparency for both the First and Second color (it can’t be made to work with just one of the colors so it goes from an opaque color to a transparent color).
First and Second: As you are probably aware, these control the start and end colors in the gradient blend.
Scale: This controls how much of the width (or height) of the item is used for the blend. The default value for this is 100%, but if a lesser value is used the area used for the blend will reduce, and if you use a greater value the blend area will grow as a percentage of the width/height of the item. Click and drag the slider or enter a value in the value field on the right.
Shift: By default this is set to create a blend which is centered within the item, but you can use Shift to change where the blend takes effect. Note that extreme values at either end of the slider will make it difficult to see any blend at all.
Angle: This controls the angle of the gradient - so if you want to create a gradient which blends from top to bottom, use 90° or -90° (or 270° or -270°) to change the blend from horizontal to vertical, depending. You can click on the up and down arrows (or enter a value in the value field) to choose a degree value in one degree increments.
Other options
Less commonly used options in the Fill Master Action palette are the following:Shape: Although a rectangle is by far the most commonly used shape to use a gradient inside, you can also choose to create an Oval, Polygon and Starburst. The Oval option (like the Rectangle) has no additional options, but Polygon and Starburst have options specific to each which you might want to experiment with.
Frame: This lets you choose a border (of a custom color and width) to outline the item containing the gradient. Although this can be done by other methods when using a Rectangle or Oval, this is the only way to achieve a border on a Polygon or Starburst shaped item containing a gradient.
Effect: Just as the Frame option lets you outline a custom shape (rather than the item container) with a border, the Effect options let you apply a drop shadow or glow to the shape.