It is very quick and simple to make a self-running slideshow on your web page by using the Target Image Action (or the Target Show/Hide Layer Action for Pro users) in tandem with the Sequence Timer Action.
However, it should be pointed out that setting up slideshows with the Sequence Timer Action takes a little longer and has fewer options than using Showcase (the application and Action introduced in Freeway 5.5). If you want to learn more about Showcase, see the Using Freeway guide (there is a Showcase tutorial and a Showcase Reference section in the What’s New in Freeway 5.5 chapter).
Sequence Timer slideshows are images which are made to change in a particular order with a speed that is set in the Sequence Timer Action.
Note that although you can use more than one Sequence Timer on a single page, all the images used in each stack will change at the same speed - and it may cause issues if you have a different number of items in more than one stack. For this reason we recommend that you use only one Sequence Timer slideshow on any single page.
Sequence Timer Slideshows for Freeway Express Users
- Draw a graphic item on your page, size it, import an image into it then crop or position it within the item’s frame.
- With the graphic item selected, copy it, paste a new item on the page (this will be placed exactly on top of the first item) then import and position a new image.
- Repeat this process to make a stack of images with the amount you want to use in the slideshow.
- Select the top item of the stack, go to Item>Actions and choose Target Image.
- In the Actions palette, click on the Parameters tab and set the Restore popup to No.
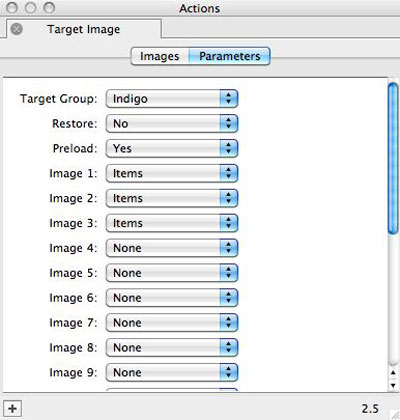
- With the item still selected, click on the Images tab and make sure each image has a checkmark in the appropriate column for the order in which to show the images. Note that you can click on the column header to see which image is which (or you may want to rename the image names in the Site Panel or the Inspector).
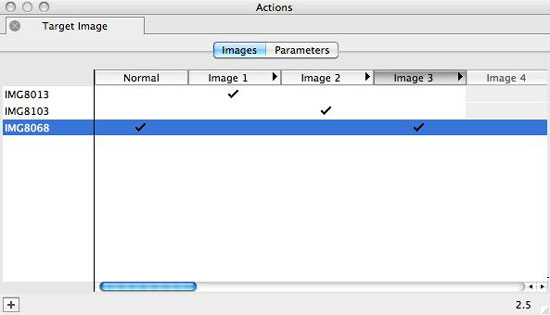
- Place a checkmark in the Normal column for the image you want to display first when the page loads (this is usually done by choosing the last image to have a checkmark in the Normal column as well as having a checkmark in the last Image column).
- Deselect all items on your page (you can do this by clicking on a blank area of the page or by clicking on the pasteboard area) then go to Page>Page Actions and choose Sequence Timer.
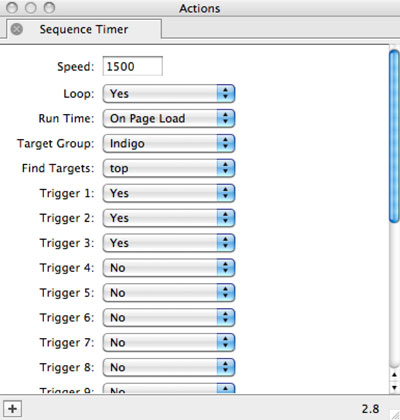
- In the Actions palette, choose a speed for the slideshow (in milliseconds), choose whether you want to the slideshow to Loop (repeat) or not, then make sure the Trigger # popups are set to Items for the amount of images you’re using in the slideshow.
- Preview in a browser to see it working.
Sequence Timer Slideshows for Freeway Pro Users
Freeway Pro supports “layer” items, so this means that each image can be targeted individually so that a soft, fading transition can be used. However, because layer items will not “combine” with each (as they do when using the Target Image Action), the workflow is very different the method used above for Freeway Express.
There is a movie tutorial on how to set up a fading slideshow on our Tutorials page (called “Fading Slide Show” which, although it is a Freeway 5 movie, will work fine with Freeway 5.5 and Freeway 6 as well).