If you don't yet have a host, the steps below will work with all of our hosting partners.
Creating the Form
- Start off by drawing a table on the page, this will be used to line up the form elements on the page. Click the Table toolbar icon and draw the table on the page. The number of rows and columns will depend on the amount of data you want to get from visitors, but, for the purpose of this tutorial, give the table 4 Rows and 2 Columns. Set the Spacing to 5px and the Padding and Border to 0px.
- Double click inside the first cell and type Name:
- Double click inside the second cell and select Text Field from the Insert menu
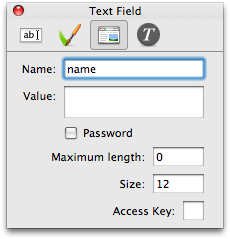
- Select this item and in the Inspector palette's third pane (Item Output settings) enter name in the Name field
- Enter Email: into the first cell of the second row
- Insert another Text Field into the second cell of the second row
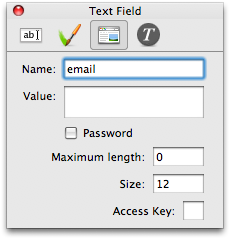
- Enter email in the Name field of the Inspector's Item Output settings.
- Enter Message: in the first cell of the third row
- Double click inside the second cell on the third row and this time select Text Area from the Insert menu
- Enter message in the Name field of the Inspector's Item Output settings.
- Double click inside the second cell of the fourth row and select Button from the Insert menu. This will be a submit button by default
- Change the appearance of what you have to fit in with your design, if you are finding that the form items you have are smaller in preview than they are in Freeway then use the Freeze Form Action to force them to a specific pixel width and height.
Controlling the Form with a Script
You now have a form on your page, the final steps are to set this form up so it can be sent to your email address.The recommended way of doing this is with the Send Form Action (it's included in both Pro and Express). You can find instructions for using the Send Form Action here.
If your hosting package doesn't have PHP or you want to try something else then there are other options available. Take a look at the following tutorial to see if it suits your needs:
Formmail tutorial (Perl/CGI)
You might also be interested in looking into using a third-party form creation method such as FormsToGo from Bebosoft which lets you set up a form which works using PHP, ASP or Perl/CGI. Please note that you will need to contact Bebosoft for support for making forms with FormsToGo.
Another excellent PHP Action can be found here along with superb documention: easiForm with Freeway