The movie you choose to offer on your web page can either be your own video (maybe one supplied by a client) or one which is already on YouTube or Vimeo. Movies hosted on YouTube or Vimeo are in HTML5 format, which falls back to Flash if the computer or device it is being viewed on doesn't support HTML5. This means that the movies will be available to iPad and iPhone users, where it will play in the device's QuickTime Player.
The benefits of hosting a movie externally on YouTube or Vimeo are:
- You can upload just about any currently popular video file format without the need to worry about which is the best format for your visitors. For further information on accepted file formats and how to present them, see YouTube http://www.google.com/support/youtube/bin/answer.py?answer=55744 or Vimeo http://vimeo.com/help/compression. However, usually you can simply upload a movie and expect it all to work fine.
- Because they are hosting the video and not you, it doesn't eat into your bandwidth allowance.
- You need only upload the movie once to YouTube or Vimeo rather than sometimes needing to upload it each time you make major edits to your page.
- The visitor can click on the Full Screen Mode button to fill their screen with the movie.
- The video controller interface of both services is very familiar to visitors
Embedding a YouTube video on your web page
There are two ways to embed a YouTube movie on your page. The first is to use the YouTube Freeway Action, the second is to copy the embed code from the service you want to use and paste the code into a "markup item" on your Freeway page (which will be covered later).If the movie is not already on YouTube you will first need to upload it to their servers, which you can only do if you have a YouTube account set up - so go to http://www.youtube.com/ and click on the Create Account link or sign in. Once you have signed into your account, click on the Upload link and then drag and drop the video file into the browser window.
Using the YouTube Freeway Action
The YouTube Action is free, but it is not included in the core set of Actions in Freeway - you need to download it from http://www.actionsforge.com/actions/view/228-youtube. Open the folder for the version of Freeway you have and then double-click on the file to install it.The YouTube Action is a "standalone" or "insert" Action, so you need to go to the page where you want to use the video, go to Insert>Action item and choose YouTube. This places the Action item on your page which is 100 pixels square (the default size of all standalone Actions when they are placed on the page), so make the item larger so you can see the instructions inside the item.
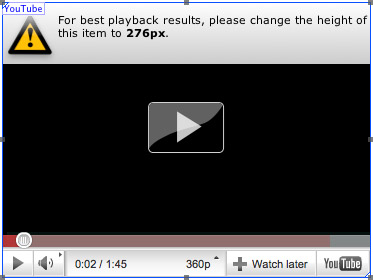
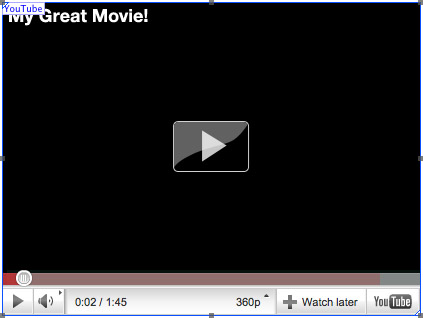
Once you have resized the item you'll see that the wording is prompting you to give the item a specific height for best playback results. The height value suggested is based on the width of the item you've resized it to - so the best way to set it up is to choose the width you want for your video then enter the best playback result value in the Inspector's height field and type a Return. Once the best playback result value has been successfully entered, you will see the content within the item change so it says "My Great Movie!" in the top left. Doing this will mean that the item is sized correctly for a standard aspect YouTube movie - if you are using a video which is in 16:9 aspect ratio, see the 16:9 Aspect Ratio bullet point below.
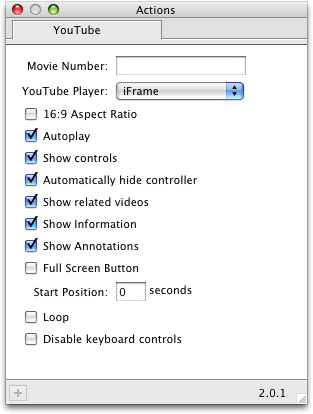
Now the item is sized correctly, look in the Actions palette to see the options available (if the Actions palette is not visible, go to the Window menu and choose Actions, then make sure the item is selected on the page). The default Action settings are shown below.
-
Movie URL: Visit the movie you want to use on the YouTube site, copy the unique movie number you see in the browser's URL bar, paste it into this field in the Actions palette and type a Return. Don't use the full URL (ie, <http://www.youtube.com/watch?v=Yg0dqXnmLAo>) just use the unique movie number (ie, Yg0dqXnmLAo), which is the numbers, letters and other characters that appear after the = character in the URL.
- YouTube Player: This gives you options to use older or restricted functionality for your movie - but we strongly recommend using the default iFrame
- 16:9 Aspect Ratio: More and more video is being used in the wider "letterbox" format, and YouTube lets you upload 16:9 aspect movies. If the movie you want to use is in 16:9 ratio, switch on this option and then resize the item accordingly using the steps mentioned above.
- Autoplay: This controls whether the movie starts to play automatically on page load. With the option switched off, the visitor will need to click on the Play button to watch the movie.
- Show controls: With the default setting checked, the movie window will display the full set of YouTube playback controls. If you uncheck this option, the visitor will only see a Play button and, once they click on that, they can only pause/unpause the playback by clicking on the movie window.
- Automatically hide controller: This gives you a choice whether to automatically show and hide the YouTube video controller bar when the visitor mouses over and off the movie window. On page load the controller bar will display at first, but if the movie is set to Autoplay or once the visitor clicks the Play button it will disappear after a second or so.
- Show related videos: With this option checked, YouTube will show a page of recommended or related videos in the movie window when the video has finished playing.
- Show information: This only works if the Autoplay option is switched off. With the Show information option switched on, the title of the movie (as used on the YouTube video page) will display as a heading at the top of the movie window.
- Show annotations: If the movie has annotations (popups, etc.) applied to it on YouTube, this option lets you choose to display them or not.
- Full Screen Button: Switch on this option to display the full screen button in the YouTube controller bar (but note that the Show controls option must be switched on so that the controller is shown) so the visitor can choose to watch the video at full screen size.
- Start Position: By default the video will play from the start, but you can enter a value (in seconds) to make the movie start at a specific point.
- Loop: Lets you choose whether the movie repeats (loops) over and over.
- Disable keyboard controls: Some browsers and computer platforms allow keyboard shortcuts to be used to control YouTube videos. This option lets you switch off that functionality.
Embedding a Vimeo video on your web page
There are two ways to embed a Vimeo movie on your page. The first is to use the Vimeo Freeway Action, the second is to copy the embed code from the service you want to use and paste the code into a "markup item" (which will be covered later).If the movie is not already on Vimeo you will first need to upload it to their servers, which you can only do if you have a Vimeo account set up - so go to http://www.vimeo.com/ and click on the Join Vimeo link or sign in. Once you have signed into your account, click on the Upload link and then choose the file to upload by clicking on the Choose a file to upload button.
Using the Vimeo Freeway Action
The Vimeo Action is free, but it is not included in the core set of Actions in Freeway - you need to download it from http://www.actionsforge.com/actions/view/202-vimeo. Double-click on the Action file to install it.The Vimeo Action is a "standalone" or "insert" Action, so you need to go to the page where you want to use the video, go to Insert>Action item and choose Vimeo. This places the Action item on your page which is 400 pixels wide by 225 pixels high, which is the most commonly used size for Vimeo movies.
Depending on the aspect of the video chosen on the Vimeo site you might need to adjust the size of the item on the Freeway page to make it fit the movie. The best way to find out the dimensions to use for the item is to visit the movie page on Vimeo.com and click on the Embed button on the right side of the movie window. This displays the "embed code" which will contain the correct dimensions of the movie - note down the width and height values and use them in Freeway's Inspector to size the item accordingly.
With the item sized correctly, look in the Actions palette to see the options available (if the Actions palette is not visible, go to the Window menu and choose Actions, then make sure the item is selected on the page). The default Action settings are shown below.
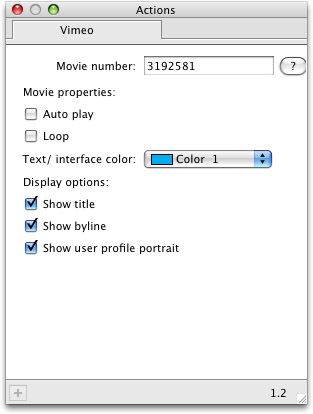
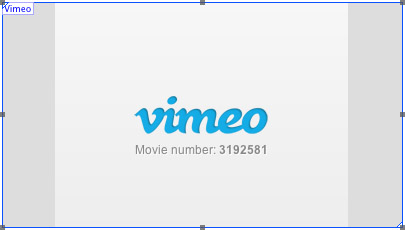
- Movie number: This is where you need to enter the unique identifying number for the video. To find this number, go to the page at Vimeo.com then copy the number in the browser's URL bar which appears after http://vimeo.com/ and paste it in this field. Note: this will only work if you copy and paste just the number - it will not work if you copy and paste the entire URL.
- Auto play: Controls whether the movie plays automatically on page load. With this option switched off, the visitor will need to click on the movie's Play button.
- Loop: Controls whether the movie repeats (loops) over and over.
- Text/interface color: Controls the color used for certain items in the movie window, such as the volume level bar, byline, etc.
- Show title, Show byline and Show user profile portrait: When the movie first appears (or until the Play button is clicked if Auto play is switched off), three optional items can be set to display in the top left of the movie window. Checking the Show title option displays the title of the movie, as used on the Vimeo page. The Show byline switches on or off the name of the Vimeo member who uploaded the movie. The Show user profile portrait option will display the Vimeo member's avatar they use at Vimeo.com. Note that the color of the byline name and title is controlled by the Text/interface color option.
Using "embed code" from YouTube or Vimeo in Freeway
Most of the options you will need for your movies can be set in the relevant Freeway Action, but there may be times when you want to include additional functionality that can only be done by using the embed code from the movie page on the web.To set up the embed options and to get the code from YouTube, click on the Share button below the movie on the movie's YouTube page. This opens a panel below where you need to click on the Embed button to see the options and the embed code itself. Any changes you make to the options will change the code, so make sure you set the options before copying the code. Make a note of the Width and Height values in the code as you will need these later.
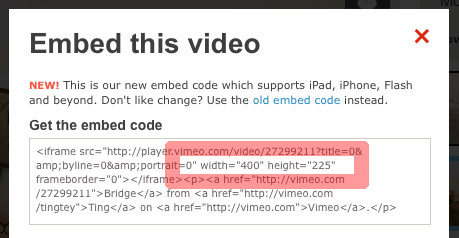
To set up the embed options and to get the code from Vimeo, go to the movie's page at Vimeo.com then click on the Embed button on the right of the movie to see a popup window. Click on the "Customize embed options" link to reveal a panel of options. Set the options for your movie first before you copy the embed code above. Make a note of the Width and Height values in the code as you will need these later.
Once you have copied the code, the way to use it in Freeway is the same whether it is a YouTube or a Vimeo movie. Go to the page on which you want to use the movie and go to Insert>Markup item. Paste the copied code into the main panel of the HTML Markup dialog and click OK. This places an item on your page (which is sized at the default markup item size of 100 pixels square) which has <H> in the top left corner, to signify that it is a markup item.
With the item selected on the page, enter the Width and Height values you noted down earlier in the respective fields of the Inspector.
There is no "live preview" for the markup item in Freeway - but you will see it working when you preview the page in a browser.